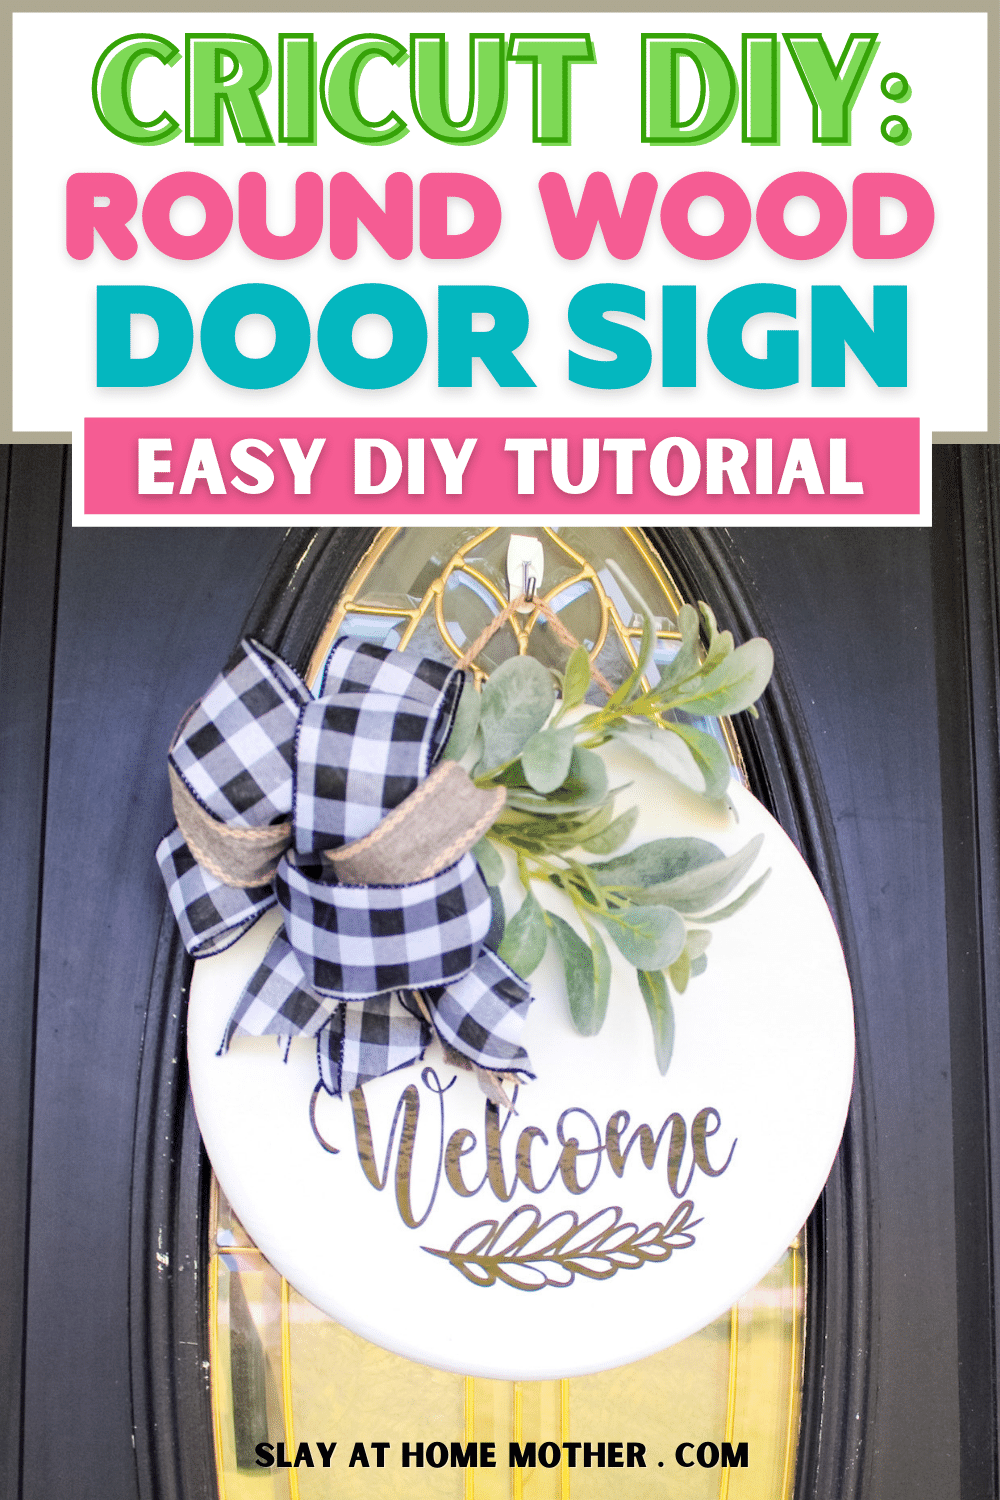
Grab your Cricut machine and make this easy DIY Round Wood Door Sign for your front door!
Hi friends!
I’m back with another awesome Cricut DIY, this time for your front door!
I actually created this sign WEEKS ago and I’m just getting around to sharing it with you guys…

It seems like summer activities have been pulling at us in every direction, and Chris and I are struggling to keep the three kiddos entertained while still being able to work from home.
But I’m happy that I’m finally able to type out this tutorial and give you the deets on making this easy front door round sign because it’s one of my favorites.
Did I already mention how easy it was to make?
Okay, good. 🙂
As always, I want to mention how much I LOVE seeing your crafts and creations, especially when I’ve helped you learn to do or create something new so please share them with me!
You can share your creations with me via Instagram (that’s where I’m the most active), here in the comments, by commenting on a Pinterest pin that inspired you, or by joining my e-mail newsletter and hitting ‘reply’ to one of the weekly e-mails I send to my wonderful readers.
Alright, let’s get down to business and make a round welcome sign together…
This is a sponsored post written by me on behalf of Cricut. This post contains affiliate links, however, all opinions are 100% mine.
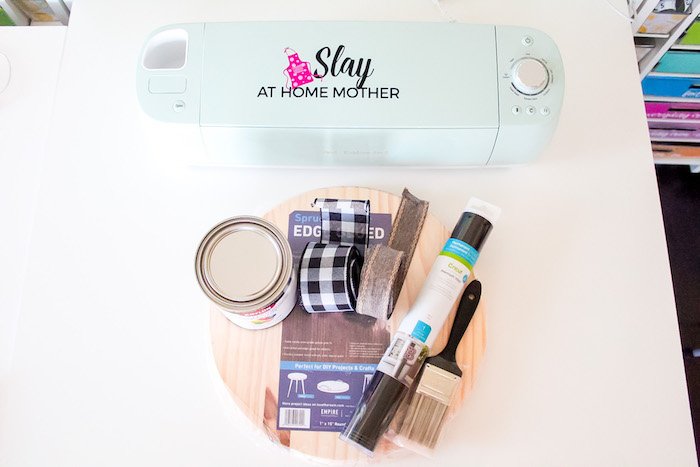
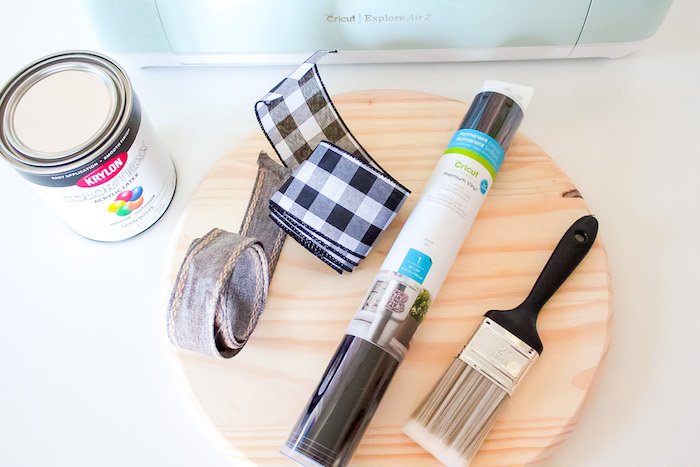
What You Need To Make A Handmade DIY Welcome Sign
I was able to create this DIY sign for just $25, which is $20-35 cheaper than what I would spend buying one outright!
Here’s what you need to make your own DIY round sign for your front door:
- 12″-15″ Round edge-glued pine wood panel (you can find these at almost any home improvement store and the price will vary depending on size- mine was only $7.78)
- paint in the color of your choice
- 2″ paintbrush
- black permanent vinyl
- LightGrip blue cutting mat
- Cricut transfer tape
- Weeder and scraper (these are both in the Cricut basic toolset)
- ribbon and/or faux greenery of your choice
- hot glue gun or staple gun
- twine
- ruler
- Explore Air 2 (or other Cricut machine, but this is the machine I have)
If you have been following my blog for a while, you’ve probably already seen my office refresh post featuring all of my Cricut materials!
My Explore Air 2 is at the forefront because I create almost all of my DIYs, labels, and crafts with it.

It is versatile enough to cut materials like:
- infusible ink
- faux leather
- corrugated corkboard
- felt
- magnetic sheets
- party foil
- printable fabric
- washi tape
- birch
- wood veneer
- and even a grocery bag!
See the full list of materials you can cut with the Explore Air 2 HERE.
It also has the ability to draw (here’s a super easy project I made using this function) and score using a Scoring Stylus.
Plus, it’s so easy to use and create with. I love connecting my machine via BlueTooth so I can design my project while taking care of the kids and my machine can be cutting my design out for me in the next room.
It cuts quickly, efficiently, and has a setting for each material which makes it simple and quick to create with.
You can label and organize, make your own gifts or cards, and even craft and create home decor with it!
It’s truly worth the investment for any crafter, maker, or DIY-er, hands down!
How To Make A DIY Round Front Door Sign
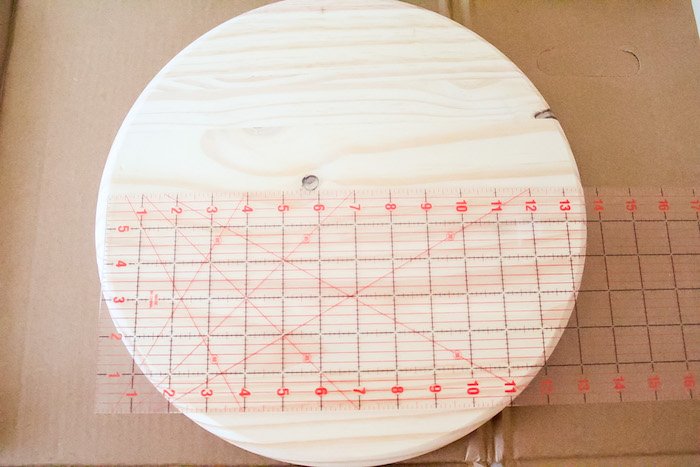
First, measure your wood round with a ruler or tape measure. I recommend doing this first so you can mentally note what size decal you will need.
I’ve made the mistake of trying to measure things after I painted them and it’s not a HUGE deal, but it makes things tricky sometimes.
You May Also Like: DreamBox Review And Craft Room Reveal
I’ve got roughly 13″ across the middle of my sign, and 9″ or so towards the bottom, so I’ll be making my Welcome lettering and design no more than 9″ wide.
Now that we’ve measured the wood, it’s time to paint!
For my wood round, I’m using white interior/exterior paint because this sign will be hanging outside.
You can use an old can of trim paint, craft paint, or paint samples you have on hand in the color of your choice, but take note of whether you have a covered porch or not, and consider if the type of paint you’re using will last!
I painted on two light coats, back to back, and laid my sign on an old cardboard box we had from our recent move.
For the second light coat, I made sure to brush the paint in the same direction along the front of the sign.
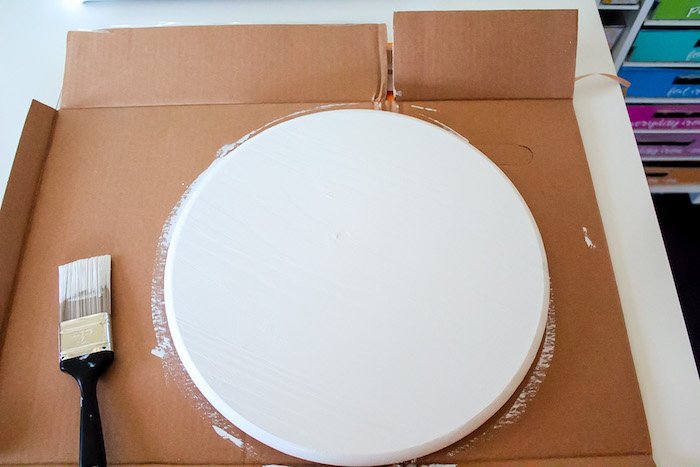
Be sure to paint the rounded edges!
If you’re making these signs to sell, I would recommend painting the sign front and back.
Now that our sign is painted and dry, we have time to design and cut with the Explore Air 2.
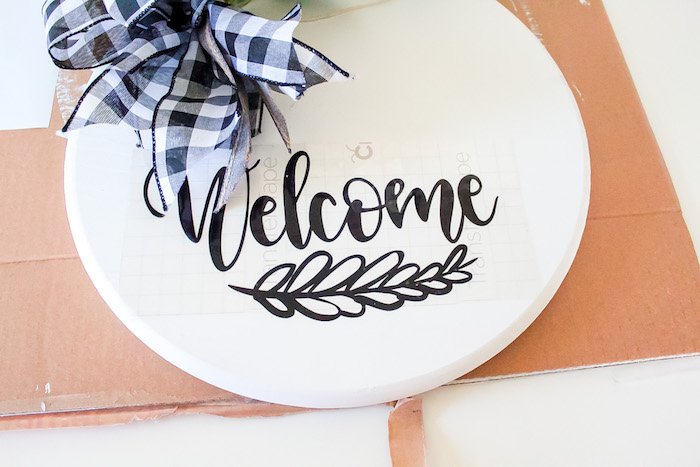
I chose a Welcome lettering design in Design Space that you can access with Cricut Access (along with 100,000+ other incredible images, fonts (including those you have stored on your computer!), and exclusive deals on Cricut materials and MACHINES) as well as a leaf image.
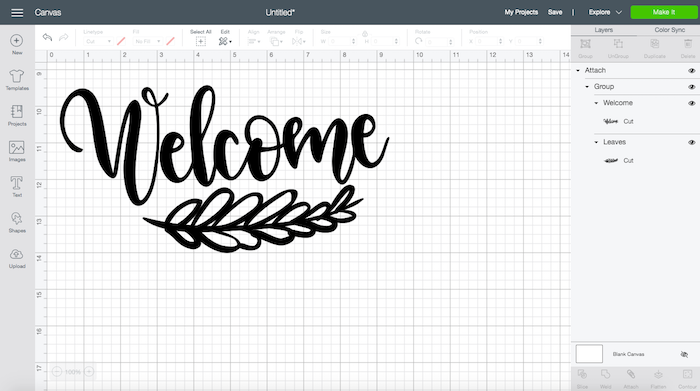
I ‘Attached‘ the two images together so they would cut together as seen in the image below…
The Attach button is located towards the bottom right of the Cricut Design Space canvas and is represented by text and a paperclip icon. This option can be selected so your design cuts as you see it on the screen.
With your wood sign still drying, press a piece of permanent vinyl in the color of your choice material-side-up onto the blue LightGrip mat and feed it into the Explore Air 2.
Cut the vinyl on the proper setting with a fine-point blade, and remove when finished.
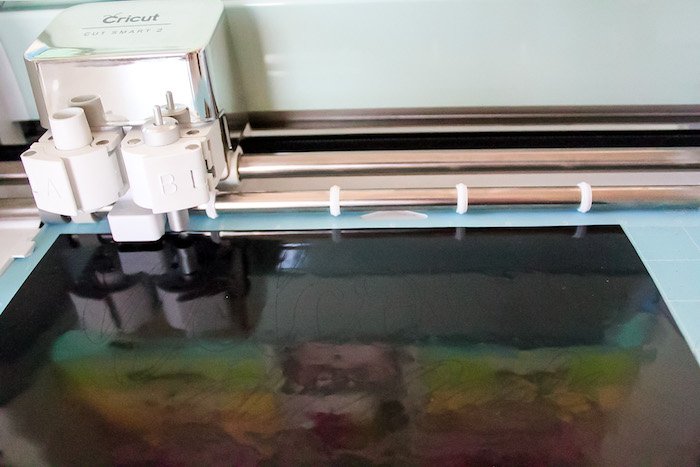
Weed excess material from your cut design, and burnish onto a piece of Cricut transfer tape.
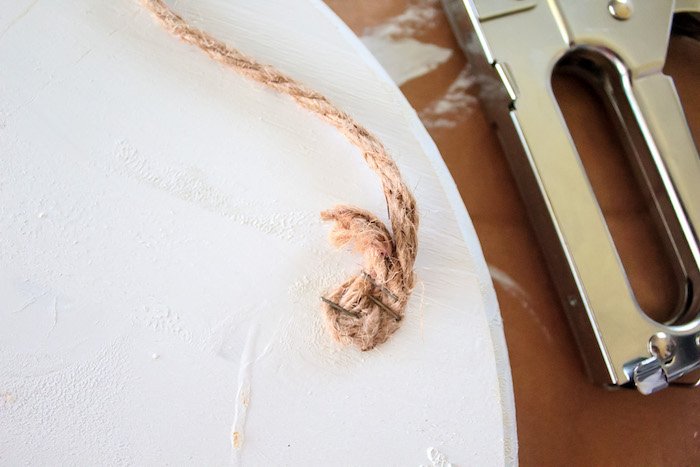
For my sign, I used a staple gun and a long piece of twine to create a way to hang my sign. I used three staples on each side of the twine on the back of my sign for stability.
You can also use a hot glue gun!
When your wood sign is dry and no longer sticky (I had to wait about 2-3 hours but you may need to give yours more time depending on the type of paint used), apply your decal with transfer tape.
StrongGrip transfer tape is NOT recommended for this project.
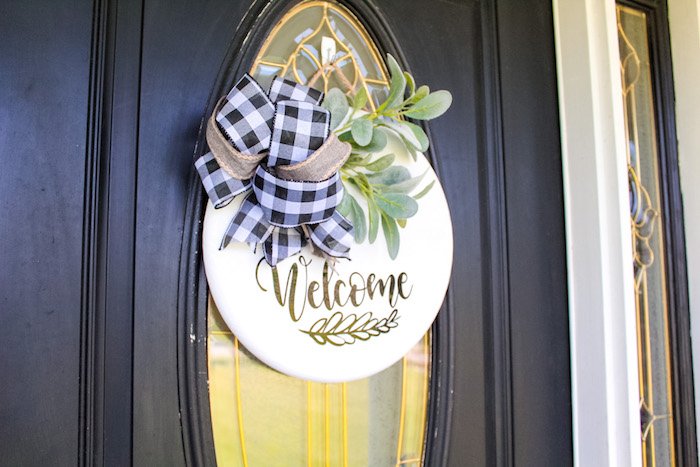
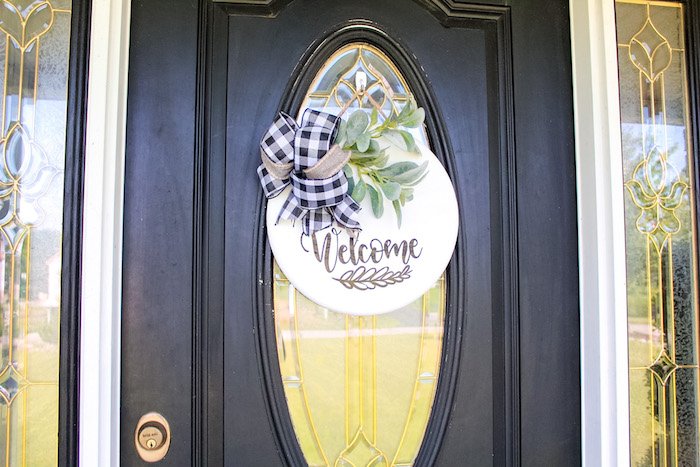
Add any embellishment you want to, whether that be with ribbon or greenery to customize your sign.
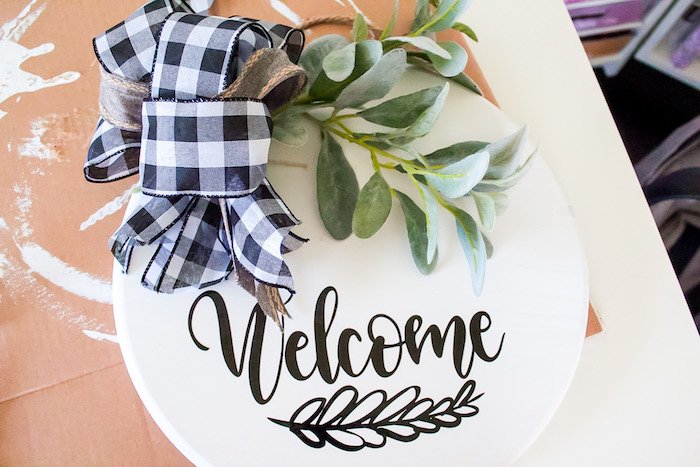
I used some leftover buffalo check wired ribbon leftover from Christmas, an old ribbon belonging to a wreath, and some lamb’s ear sprigs I stole from our dining room centerpiece.
Once our decal is on your sign, you can also add a finishing coat of polycrylic to seal everything in, but I didn’t find this step to be necessary, especially when using Cricut permanent vinyl.
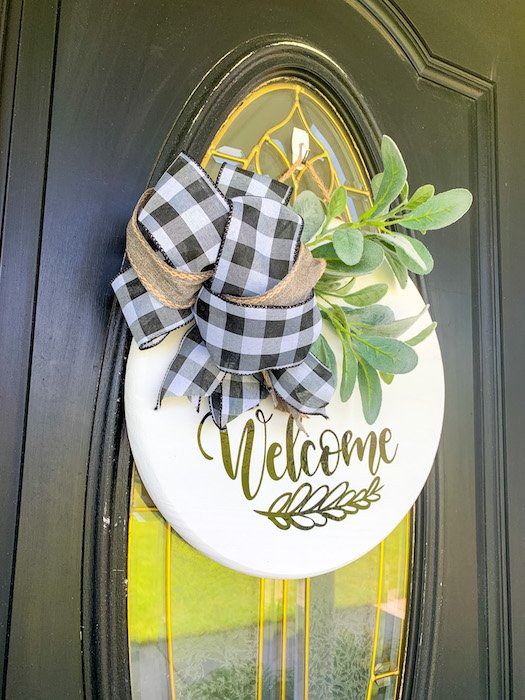
Once your sign is finished, hang it up on your front door for all of the neighbors to see!
This was such a fun project and I’m so happy to finally be able to share it with all of you.
If you liked this post, be sure to check out these other posts featuring the Cricut Explore Air 2:
DIY Monogram Tumbler (Easy $4 Mermaid Tumbler Tutorial)
How To Create A Monogram In Design Space ($5 DIY Keychains With Monograms)
What Is Infusible Ink (Easy DIY Infusible Ink Coasters Tutorial)
DIY Dino-Mite Valentine’s Day Coloring Cards
Print Then Cut Cricut Tutorial: Easy DIY Stickers for About $0.12!
Share your latest project or Cricut question with me in the comments below!
*Post originally published July 2020, updated January 2023.

I got the explore 2 for Christmas and have been learning about it since then. Haven’t fired it up yet, but think today I might be ready. Thanks for some great ideas that are great to begin with.
Hi! Where can I find the ruler that you use?
Hi Amy, here’s the link to mine: https://amzn.to/3oWPVo1. I love using it to measure projects like this or when I’m sewing. 🙂
How did you attach the greenery and ribbon, I didn’t see that in your instructions or I missed it. Thanks!!!
Hi! I used a staple gun 🙂